0x1 介绍
随着Apple M1 Soc的问世,大家对其集成的GPU也是充满了好奇,根据专业软件的评测,该GPU的性能也是相当强悍。
但是秉承Apple封闭的特性,人们很难直接对其有更深入的了解。但是这个阻挡不了hacker借助各种手段来对其进行逆向分析。
本文就是对目前Apple M1 GPU的逆向分析进展的一个总结。
我们知道Mesa是Linux上开源的图形驱动,支持了Intel,AMD,Broadcom VideoCore,Qualcomm Adreno, ARM Mali, Vivante等厂家的GPU驱动,对了,好像被你看出来了少了谁,这就是Imagination GPU,是的Imagination内部支持Mesa的工程师跳槽到Intel以后,mesa中Imagination GPU的支持就一直没有进展。
Mesa开发模式简单说来有两种,一种是企业支持的开发,如Intel Open source center是Mesa最大的贡献者,开发了Mesa框架,编译器,Intel Gen GPU驱动等。Broadcom也支持了内部工程师来开发Mesa中有关VideoCore GPU的驱动。采用这种模式开发的话可以访问该公司内部完整的技术文档,包括GPU spec,GPU ISA document等。这种开发模式基本是follow对应closed source的GPU驱动流程,根据内部的GPU参考代码,在Mesa中做移植,没有涉及到逆向工程的概念。
另外一种是独立开发模式,这种主要通过逆向工程来分析GPU的特征。这种模式开发的驱动,一看这个取名就很有意思,freedreno,etnaviv,lima,一看就是野路子,就是把人家的名字反过来叫。采用这种模式开发的GPU驱动是在没有参考代码对GPU的特性做逆向分析,然后归纳总结出QPU驱动的流程来,需要完成GPU ISA的总结,开发GPU ISA编译器后端,开发GPU command stream的构造器。使其可以对接到kernel驱动中。采用这种模式开发可以参考的是GPU kernel driver的代码,因为Linux kernel driver代码一般是GPL协议的,可以在网上找到对应的源代码。下面要说的Apple M1 GPU就是通过这种方式开发的。通过了解这个过程,我们可以知道怎样通过逆向分析来完成一个GPU用户态驱动的开发。
这个逆向分析过程由Alyssa Rosenzweig提供,Alyssa Rosenzweig因为负责Mesa中Mali GPU(Panfrost)驱动的逆向开发工作而获得了2021年度的杰出自由软件贡献者奖。
其开发过程如下。
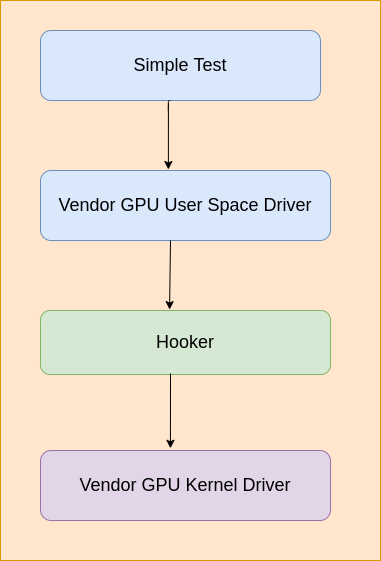
开发Linux or Android逆向GPU驱动的过程如下。
写一个hook库,该hook库用来hook ioctl和mmap接口,然后通过LD_PRELOAD加载进测试程序中,然后在hook的ioctl和mmap函数中分析GPU用户态发送到
内核态的内容,一旦“submit command buffer”被触发,就把内存中的内容dump到文件中,可以用来做进一步分析。
Apple系统上逆向过程如下。
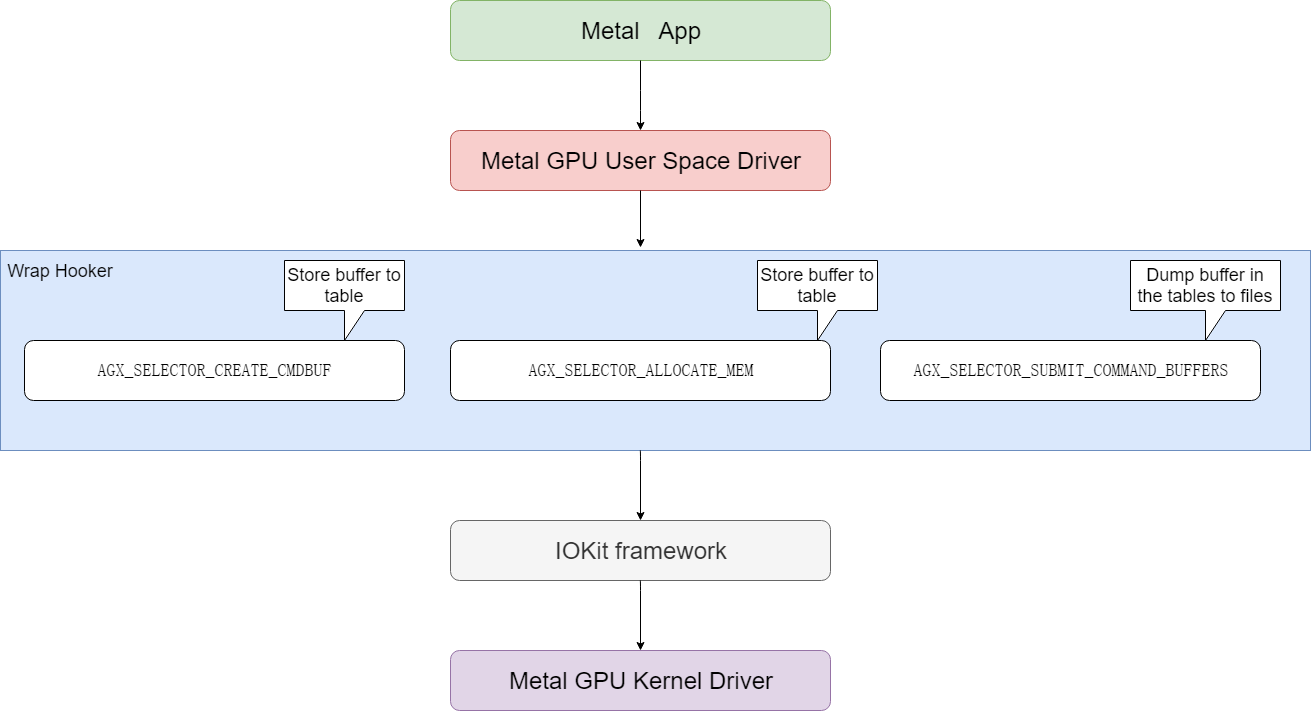
M1 GPU的逆向分析过程也和上面的过程类似,只是macOS上没有LD_PRELOAD,只有类似的机制DYLD_INSERT_LIBRARIES,另外ioctl也是没有的,需要用
macOS上的IOKit framework来代替。IOKit framework是macOS上GPU用户态驱动到内核态驱动的桥梁,其中和ioctl类似的入口函数是IOConnectCallMethod。
下面来详细介绍一下这个逆向过程
提供对IOKit中函数IOConnectCallMethod的包装,也就是说对IOKit进行了hook。
重点关注下面三处调用。memory allocation, command buffer creation, and command buffer submission
把上面的hook接好了以后,就可以利用上面的hook机制来分析驱动了。下面说了这个标准过程,就是利用一个简单的Metal测试程序,
然后在hook中dump驱动的二进制输出,然后对Metal测试程序做一个小修改,然后dump驱动的二进制输出,并和修改前的dump输出进行比较,从而推断出某一个二进制GPU指令对应的含义。通过上面的分析,可以得出M1 GPU的大概特性。
123456789101112131415161718192021222324One, the architecture is scalar. Unlike some GPUs that are scalar for 32-bits but vectorized for 16-bits,the M1’s GPU is scalar at all bit sizes. Yet Metal optimization resources imply 16-bit arithmeticshould be significantly faster, in addition to a reduction of register usage leading to higher threadcount (occupancy). This suggests the hardware is superscalar, with more 16-bit ALUs than 32-bit ALUs,allowing the part to benefit from low-precision graphics shaders much more than competing chips can,while removing a great deal of complexity from the compiler.Two, the architecture seems to handle scheduling in hardware, common among desktop GPUs but less so in the embedded space.This again makes the compiler simpler at the expense of more hardware. Instructions seem to have minimal encodingoverhead, unlike other architectures which need to pad out instructions with nop’s to accommodate highly constrainedinstruction sets.Three, various modifiers are supported. Floating-point ALUs can do clamps (saturate), negates, and absolute valuemodifiers “for free”, a common shader architecture trait. Further, most (all?) instructions can type-convertbetween 16-bit and 32-bit “for free” on both the destination and the sources, which allows the compilerto be much more aggressive about using 16-bit operations without risking conversion overheads.On the integer side, various bitwise complements and shifts are allowed on certain instructions for free.None of this is unique to Apple’s design, but it’s worth noting all the same.Finally, not all ALU instructions have the same timing. Instructions like imad, used to multiply two integers andadd a third, are avoided in favour of repeated iadd integer addition instructions where possible.This also suggests a superscalar architecture; software-scheduled designs like those I work on for my dayjob cannot exploit differences in pipeline length, inadvertently slowing down simple instructions to matchthe speed of complex ones.分析command stream的构建过程,完成以后,我们可以编写一个简单的测试程序跑起来。
0x2 GPU驱动分析
下面来介绍一下这个通过逆向分析得到的GPU驱动。
0x21 wrap
wrap模块定义了下面hook导出函数供应用程序调用,用来接管IOKit中对应的函数。
|
|
然后在图形测试程序运行的时候,会先调用到wrap实现的hook函数中,然后在hook中内存分配(AGX_SELECTOR_ALLOCATE_MEM)和cmd buffer创建(AGX_SELECTOR_CREATE_CMDBUF)被调用的时候记录相应的buffer内存地址,在command命令提交的时候(AGX_SELECTOR_SUBMIT_COMMAND_BUFFERS)把前面保存的buffer保存到文件中。hook函数在完成前述的hook任务以后,再调用真正的IOKit函数,完成对MacOS系统GPU kernel驱动的调用。
0x22 disasm
前面已经把所有包含GPU渲染命令的buffer都保存到文件了,下一步就是要分析这些文件了,这个时候需要disasm发挥作用了。
我们知道M1 GPU是没有公开的文档,开发disasm也是需要反复修改测试程序,然后通过wrap收集到修改后测试程序的命令。通过仔细比较差异来推测这些buffer里面对应的二进制的含义。目前disasm只是对部分GPU ISA进行了解析,对command stream部分的解析没有完成。
目前已经分析出来的部分GPU ISA的opcode如下所示。
|
|
0x23 demo
demo是hack一个简单的测试程序,来驱动M1 GPU kernel driver完成绘制工作。我们前面的wrap有点类似record的意思,这个demo是把record的东西playback出来,playback的输入有些是直接从record的buffer中得到的,有些是通过分析已经大概知道了命令的格式,可以自由地配置出来。
demo启动后首先要通过open类似的接口IOServiceOpen()打开GPU kernel驱动,然后就可以往kernel driver发送内容了。
发送渲染内容到kernel driver的完整代码如下。
|
|
上述过程简单说明如下。
a. 通过AGX_SELECTOR_CREATE_COMMAND_QUEUE创建command queue。
b. 通过AGX_SELECTOR_ALLOCATE_MEM分配buffer,包括AGX_MEMORY_TYPE_FRAMEBUFFER,AGX_MEMORY_TYPE_SHADER,AGX_MEMORY_TYPE_CMDBUF_32等类型的buffer。
c. 通过AGX_SELECTOR_CREATE_CMDBUF分配cmd buffer。
d. 下面开始往前面分配的buffer中填充具体的渲染数据了。这些渲染数据有的是前面通过wrap方式保存下来的,有的是分析后知道格式后自己配置的。这些渲染数据包括shader数据,其中包括了GPU指令,另外就是command stream控制命令。
e. 数据都准备好了,下面就是可以调用AGX_SELECTOR_SUBMIT_COMMAND_BUFFERS提交到GPU执行了。
f. 等等GPU执行完成以后,就可以把framebuffer中的内容读取出来了,直接读取framebuffer.map地址所对应的内容即可,需要注意的是framebuffer里面的内容是tile格式的,需要完成到raster格式的转换才能正确地显示出来。
0x3 总结
目前的驱动基本上是record + playback + kernel的模式,对Shader source code -> GPU ISA的生成和Command Stream的动态配置没有涉及到。其实是为后续通过逆向分析来开发GPU ISA和Command Stream的动态生成提供了框架。后续的开发工作可以在这个框架的基础上继续开发。
0x4 参考
asahi-gpu-part-1
asahi-gpu-part-2
free-software-awards-winners
AsahiLinux GPU
Apple GPU M1 ISA
IOKit参考